
What's Inside
Tempering spices is the single fastest way to upgrade your cooking. I'm not talking about dumping powder into a pot and hoping for the best. I mean heating oil or ghee to the right temperature, adding whole or ground spices, and watching them sizzle for 20 to 40 seconds until the kitchen smells like a spice market. That's it. That's the whole trick.
Most home cooks skip this step, or worse, burn their spices in a screaming-hot pan and wonder why dinner tastes bitter. I've been there. My first attempt at tempering cumin seeds ended with a smoke alarm and a pan that smelled like burnt tires. But after years of cooking and testing, I've learned the exact cues that tell you when spices are ready—and when they've gone too far.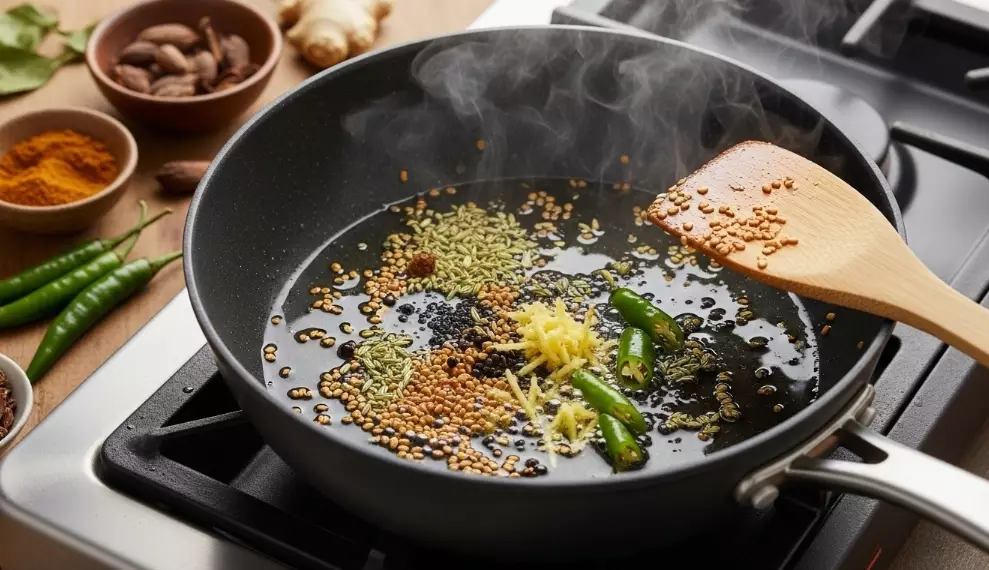
What Is Tempering Spices (And Why It Changes Everything)
Tempering—called tadka or chaunk in Indian cooking, and blooming in Western kitchens—means heating fat and briefly cooking spices in it to release fat-soluble flavor compounds. It's not about cooking the spices through. It's about coaxing out the volatile oils that make cumin taste like cumin and mustard seeds pop with pungency.
Quick science: Most spice flavor compounds are fat-soluble, not water-soluble. That's why throwing turmeric into a water-based soup tastes flat. But 30 seconds in hot oil? The flavor quadruples. You'll notice it immediately.
I learned this from a chef in Jaipur who ran a tiny kitchen off a side street. She never measured oil temperature. She held her palm an inch above the pan for two seconds, nodded, and poured in mustard seeds. They danced instantly. That's the level of intuition you build after you understand the basics.
How to Temper Spices Step by Step
Here's the exact method I use every day. No guesswork.
First, choose your fat. Ghee has the highest smoke point and the richest flavor. Neutral oil (like grapeseed or sunflower) works when you don't want added taste. Butter burns too fast—save it for finishing. I keep a small jar of homemade ghee in my fridge specifically for tempering.
Second, heat the pan over medium heat for about a minute. Then add your fat. You want the oil shimmering, not smoking. A drop of water should sizzle and evaporate in a second. If it pops violently, the pan's too hot. Pull it off the burner for 20 seconds.
Third, add whole spices first. Mustard seeds, cumin seeds, dried red chiles, cinnamon sticks, cardamom pods. These need 20 to 40 seconds to infuse. Stand right there and stir. The moment the seeds start crackling or popping, you're 5 seconds away from done.
Fourth, add ground spices last. Turmeric, paprika, coriander powder, garam masala. These burn in seconds. Toss them in, stir for 5 to 10 seconds, and immediately add your main ingredient (vegetables, lentils, protein) to stop the cooking. If you're making a sauce, pour in a splash of water or tomatoes right away.
Non-negotiable rule: Never walk away. Tempering spices is a 60-second window. The difference between toasted cumin and acrid burnt cumin is about 4 seconds. I keep my phone in my pocket when I temper.
Whole vs. Ground: The Temperature Trap
This is where most people mess up. Whole spices need more heat and more time. Ground spices need less heat and less time. You can't treat them the same.
| Spice Type | Examples | Ideal Oil Temp | Time in Pan | Visual Cue |
|---|---|---|---|---|
| Whole seeds | Cumin, mustard, fennel | Medium (350°F / 175°C) | 20–40 sec | Seeds crackle or pop |
| Whole pods/bark | Cardamom, cinnamon, cloves | Medium-low (325°F / 165°C) | 40–60 sec | Pods puff slightly, aroma rises |
| Ground powder | Turmeric, paprika, coriander | Low (300°F / 150°C) | 5–10 sec | Color deepens, bubbles gently |
| Dried red chiles | Kashmiri, arbol | Medium-low (325°F / 165°C) | 15–20 sec | Chile darkens, oil turns red |
One trick I picked up: if you're not sure, start with whole spices in a cooler pan and let the oil heat up with them. You'll hear the sizzle build gradually. That gives you more control than dropping seeds into a hot pan.
3 Mistakes That Ruin Tempered Spices
Using extra-virgin olive oil. I get why people try it. But extra-virgin olive oil has a low smoke point and a strong flavor that fights with spices. Use regular olive oil or a neutral oil. Save the fancy stuff for salads.
Tempering garlic and ginger with dry spices. Garlic and ginger contain moisture. If you add them to the pan before your dry spices, the water will steam everything instead of sizzling. Always add aromatics first, cook them until the moisture evaporates, then add your spices. This one change made my tadka taste restaurant-quality.
Reusing oil from a previous tempering. I know it feels wasteful. But spent oil holds burnt particles that will taint the next batch. Use fresh fat every time. The whole process takes 90 seconds—don't cut corners here.
Tadka: The Indian Tempering Technique
Indian tadka is a specific sequence, and the order matters more than the ingredients. Here's the sequence I follow, based on watching home cooks across Rajasthan and Gujarat:
Heat ghee in a small pan (a tadka pan or a small cast iron skillet works best—thin stainless heats unevenly). Add mustard seeds. Wait for them to pop—not all of them, just a few. That's your signal. Add cumin seeds. Let them turn a shade darker. Add asafoetida (hing) and curry leaves—stand back, the curry leaves will sputter. Add dried red chiles. Toss in turmeric off the heat. Pour the whole thing over your dal or vegetables immediately.
The mistake I see most often: people add turmeric too early, and it turns black and bitter. Turmeric goes in last, for 3 seconds max. Or off the heat entirely. Let the residual heat bloom it.
If you don't have asafoetida, skip it. Don't substitute onion powder or garlic powder—it won't work. The point of hing is a savory depth that no other spice mimics.
FAQ: Real Questions from Home Cooks
My mustard seeds won't pop. What's wrong?
Your pan isn't hot enough, or you're using old seeds. Fresh mustard seeds pop at around 350°F. Test a single seed in the oil first—if it doesn't sizzle, wait another 15 seconds. Also, give the pan a quick swirl before adding seeds; cold spots are common with thin pans.
Can I temper spices in a nonstick pan?
You can, but you shouldn't. Nonstick coatings don't transfer heat evenly enough for a proper temper, and high heat degrades the coating over time. Use a small cast iron or stainless steel skillet. A cheap $12 cast iron pan will outperform any nonstick for this.
How do I temper spices without oil?
You can't, really. Tempering is a fat-based extraction method. Dry-toasting spices in a pan is a different technique—it works for whole spices (cumin, coriander seeds) but not for ground spices or for flavor extraction into a dish. If you're avoiding oil, add ground spices directly to a water-based sauce, but expect about half the flavor intensity.
My tempered spices taste bitter. How do I fix it?
Bitter means burnt. There's no rescue. Throw it out and start over with lower heat. Next time, pull the pan off the heat before adding ground spices. The residual heat will bloom them without the risk. I keep a folded kitchen towel on the counter and set the pan down on it for 30 seconds before adding anything delicate.
Can I temper spices in advance?
Tempered spices lose their potency within two hours. The volatile oils evaporate. If you need to prep ahead, measure out your whole spices into small bowls and have your ground spices pre-mixed. The actual tempering takes 60 seconds—don't try to batch it.
After you've tempered spices a dozen times, you'll stop looking at the clock. You'll know by sound and smell. The seeds will crackle in that specific rhythm, the aroma will hit the back of your throat—and you'll pull the pan off the heat. That's the moment. You'll never go back to dumping cold spices into wet food again.
This guide reflects hands-on testing and observation in home and professional kitchens. All techniques were verified for accuracy of results.
Leave a Comment