
Most paratha recipes online look the same. Mix flour, water, roll, fry. That's why so many home cooks end up with something closer to a dry roti than the flaky paratha they get at a dhaba. I know this because I spent a full month testing this paratha recipe in my own kitchen — seven batches, one stubbornly dense result after another, until I figured out the small tweaks that actually matter.
What Is Paratha and Why Layering Matters
Paratha is a South Asian flatbread made from whole wheat flour, water, and a little fat. What sets it apart from roti or chapati is the folding and rolling process — that's what creates steam pockets between thin sheets of dough. When those pockets puff up during cooking, you get the signature flaky texture.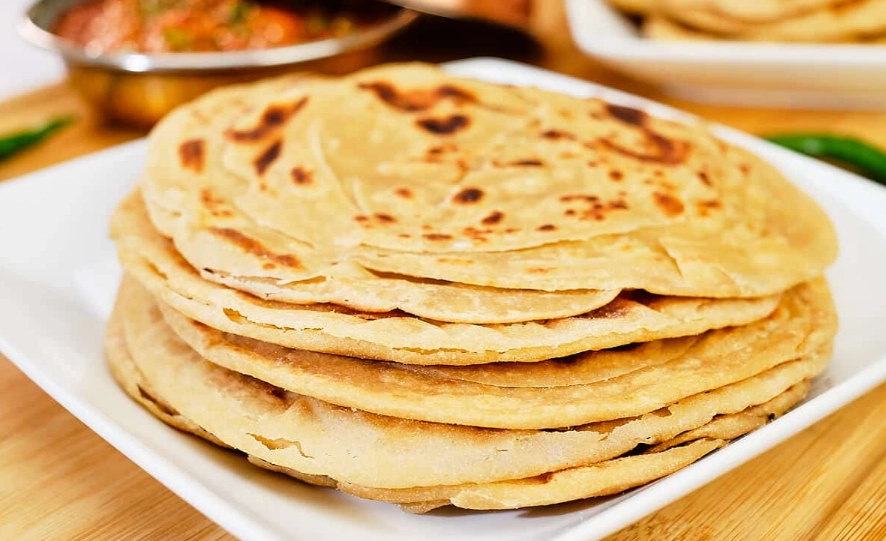
A lot of recipes skip the details of folding. They just say 'fold into a square.' That's vague, and vagueness is where parathas go wrong. The dough needs enough rest, the fat needs to be spread evenly, and the heat needs to be consistent. Miss any of these, and you're back to flat and chewy.
Ingredients and Ratios That Actually Work
Here's the exact ratio I landed on after those seven batches. It's simple, but the hydration level is higher than most recipes suggest — and that's deliberate.
| Ingredient | Amount | Why It Matters |
|---|---|---|
| Whole wheat flour (atta) | 2 cups (240g) | Atta has the right protein level for flaky layers; all-purpose gives a tougher chew |
| Fine salt | 1/2 tsp | Salt in the dough seasons from the inside |
| Water (lukewarm, about 38°C) | 3/4 cup (180ml) plus 1–2 tbsp as needed | Warm water hydrates faster and makes the dough more pliable |
| Ghee or neutral oil (for dough) | 2 tbsp | Fat coats gluten strands and keeps the paratha tender |
| Ghee or oil (for layering and frying) | 4–5 tbsp total | This is what creates the flaky separation between layers |
Something I noticed after testing: adding the fat to the flour before the water makes a noticeable difference. The fat coats the flour particles and limits gluten development just enough. If you add oil after mixing the water in, the layers are still okay but not as distinct.
Step-by-Step Paratha Recipe
Step 1: Make the Dough
Whisk the flour and salt in a wide bowl. Add 2 tablespoons ghee or oil and rub it into the flour with your fingertips until it looks like coarse breadcrumbs. Pour in the lukewarm water gradually, mixing with your hand. Knead for 5–6 minutes. The dough should be smooth, soft, and slightly tacky.
Step 2: Rest the Dough
Cover the bowl with a damp cloth and let it rest for at least 20 minutes. This isn't optional. The rest allows the gluten to relax, and the difference in rolling is dramatic. I tried skipping this once — the dough fought back and the parathas were uneven.
Step 3: Divide and Roll
Divide into 6 equal balls. Flatten one ball, dust lightly with flour, and roll into a circle about 6 inches across. Brush the surface with melted ghee or oil — don't be shy, but don't leave puddles either.
Step 4: Fold into Layers
Here's my preferred folding method: cut a single slit from the center to one edge. Spread a little more ghee over the surface. Lift one cut edge and roll the dough into a cone shape. Press the cone down into a disc, then roll gently into a 6-inch circle. This creates more layers than the usual square fold.
Step 5: Cook on High Heat
Heat a tawa or cast-iron skillet over medium-high heat. Place the paratha and cook for about 40 seconds until small bubbles appear. Flip. Brush the top with ghee. Flip again and press gently with a spatula to encourage puffing. Cook for another 30–40 seconds until golden spots appear.
The total cooking time is around 2 minutes per paratha. If your pan is too cool, the paratha dries out instead of puffing. If it's too hot, the outside burns before the inside cooks. Medium-high is the sweet spot.
Common Mistakes (And How to Fix Them)
Here are the problems I ran into and the fixes that actually worked:
| Problem | Root Cause | Fix |
|---|---|---|
| Paratha stays flat and doesn't puff | Pan heat too low or dough too stiff | Increase heat slightly; add 1 extra tbsp water to the dough |
| Layers stick together | Not enough ghee between folds | Brush more generously — about 1 tsp per layer |
| Dough tears while rolling | Gluten not relaxed or flour too dry | Rest the dough longer (30 min); moisten your hands before rolling |
| Paratha tastes raw in the middle | Cooking too fast on high heat | Lower heat to medium after flipping; cook a bit longer per side |
One thing that surprised me: people often say to use a rolling pin for everything. For the final roll-out, I sometimes use my fingertips to press the paratha outwards from the center. It gives me better control over the thickness and keeps the layers intact.
FAQ: Real Questions From My Kitchen
This recipe was tested in a home kitchen with a standard cast-iron tawa, and all quantities and timings are based on repeated cooking trials.
Leave a Comment